Wednesday, December 27, 2017

New Occasions Catalog Goodies

Hey, y'all! How was everyone's Christmas? I hope it was very merry :)

I was so busy the last part of this year, and I didn't have much time to get on here and blog. Sorry about that! I do my best, but you know, that pesky job thing gets in the way too ;)

I'm here today to share some exciting news. Stampin' Up! will be releasing the new Occasions and Sale-A-Bration items for sale to the public next week (January 3rd to be exact). There are so many beautiful sets, you won't want to miss out. Especially since during Sale-A-Bration, you can earn free product with each $50 you spend! And this year they've added $100 free product as well. I'm loving it. I wish I had more time (and money) so I could play with all the things.


This is a card I made with one of the new Occasions bundles. Could you just die with how fun this is? I have loved rainbows every since I was young (this might be an 80s child thing), and they are coming back. Yay!

I like to decorate the inside of may cards with just a little something, and that cloud stamp was calling my name. Isn't it cute?


I used the following Stampin' Up! products available for purchase in my SU store at the link in the sidebar :) 
Cardstock: Real Red, Melon Mambo, Tangerine Tango, Daffodil Delight, Old Olive, Pacific Point, and Rich Razzleberry
Specialty Paper: Watercolor Paper, Vellum Cardstock, and Dazzling Diamonds Glimmer Paper
Ink Pads: Memento Tuxedo Black, Pool Party and VersaMark
Markers: Tempting Turquoise (used smooshing technique with water spray)Stamp Sets: Sunshine & Rainbows (available January 3rd, Occasions catalog)
Dies: Rainbow Builder Framelits (available January 3rd, Occasions catalog)
Adhesives: Fast Fuse (good when using watercolor paper as it warps a little bit), Snail Adhesive and Stampin' Dimensionals
Other Accessories: Iridescent Sequin Assortment

I got a few other sets that I can't wait to play with too. So stay tuned for that. And if you just love anything I share or want to see more, the link to my Stampin' Up! store is in the upper right of the page links. Happy shopping!

As always, thank you so much for stopping by. And I hope you found something interesting to inspire you here today.


Monday, December 4, 2017

My DIY Christmas Ball Wreath

Well folks, life got hectic on me and I haven't posted in nearly a month. But, I am back, so let's get to it.

I don't have a card or stamped creation to share with you today. But I do have a crafty item!


I decided to join a December Photo A Day challenge this year. Today's prompt was "Joyful".

I love Christmas, and I love making my own decorations. I get that from my mom. She was crafty and loved Christmas too. So, I always think a lot about her in December and while I'm crafting. This makes me joyful :)

I especially like to make my own wreaths. I don't have a lot of room in our small home (900 square ft) to decorate. So the door is usually one of the few places that gets any holiday attention (except during Christmas time of course).

I didn't make a tutorial for this wreath because there are literally hundreds on Pinterest. You can just search "Christmas Ornament Wreath" and find a crap ton. Lol. But I still wanted to show you what I ended up with. Isn't it pretty? I love it. But don't look too close. There is a lot of hot glue, and you can see some of it. But I think I did pretty good for my first time.


I will share that this wreath costs a lot more to make than one might think (or hope) lol. I originally thought I could just buy like 4-6 sleeves of Christmas ball ornaments from Dollar Tree and then an inexpensive wreath form from Hobby Lobby. I think I probably ended up buying double (or more) the amount of ball ornaments. But the whole wreath still only cost me less than $20. The wreath was relatively inexpensive. I think I paid like $4 with a coupon. Not too bad. And I had boat loads of glue sticks in my stash.

As always, thank you so much for stopping by. I hope you found something interesting to inspire you here today.


Wednesday, November 15, 2017

Night of Navy Gingham Snowflake Card

Hello stampy friends. I just thought I'd share a card I made a week or so ago. I forgot to share it when I made it. I had been in a cardmaking slump. No inspiration at all. Then I found a card by Nadine's Stampin' Club that was very similar while perusing Pinterest and thought, "Hey, I could do something like that." I was itching to use the Winter Wonder embossing folder again, and I've never even cracked my gingham ribbon open, so this seemed perfect.


I really like the Night of Navy with the Smoky Slate cardstock. I think it gives it a bit of a more elegant feel.


I had an extra piece of cardstock that had been embossed with the Winter Wonder folder, so I decided to use that for the writing panel inside of the card.


I used the following Stampin' Up! products available for purchase in my SU store at the link in the sidebar :) 
Cardstock: Night of Navy, Smoky Slate, Whisper White
Ink Pads: Night of Navy
Stamp Sets: Star of Light
Adhesives: Snail Adhesive 
Other Accessories: Winter Wonder Textured Impressions Embossing Folder, Night of Navy Gingham Ribbon, Rhinestone Basic Jewels

As always, thank you so much for stopping by. I hope you found something interesting to inspire you here today.


Monday, November 13, 2017

Pining for Plaid

Hey there! I'm back. Three days in a row. I'm impressed with myself :) This won't keep up though. I just don't have time with a full time job during the week (boo!). But it has been nice to be able to take some time to create and use the stuff I have. It does me a world of good to play with paper and ink.

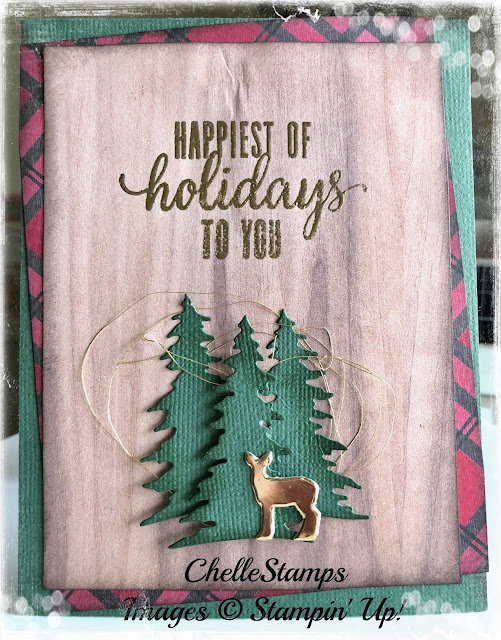
I'm still playing with the sentiment stamps from my October Paper Pumpkin kit. I think the name of it is "Pining for Plaid". I should have mentioned that previously.


This card was pretty much CASED from one by Susan Campfield. Check her card out here
I used the sentiment stamp from the Pining for Plaid set along with the dies from Card Front Builder Thinlets, some current and retired designer series papers, metallic thread, and some contraband (non-SU cardstock) to create this woodsy looking Christmas card. I think this one will probably belong to my dad. Hope he likes it.


I used the following Stampin' Up! products available for purchase in my SU store at the link in the sidebar :) 
Cardstock: Scraps of gold foil sheets from Stampin' Up. I also used some non-SU cardstock from my stash. I think the color would be similar to Garden Green, 
Designer Series Paper: Wood Textures and Warmth & Cheer (retired)
Ink Pads: Early Espresso, VersaMark
Stamp Sets: Pining for Plaid (Octoer Paper Pumpkin Kit)
Dies: Card Front Builder dies (trees and deer)
Adhesives: Snail Adhesive and Stampin' Dimensionals
Other Accessories: Stampin' Sponges for inking edges, gold metallic thread and gold embossing powder mixed with dazzling diamonds

As always, thank you so much for stopping by. I hope you found something interesting to inspire you here today.


Sunday, November 12, 2017

Joyful Christmas

I so enjoyed making the Christmas cards with my October Paper Pumpkin kit the other day that I was itching to get back in my craftroom and do some more. I am crazy loving the big sentiments in last months kit, so I wanted to use them some more. I think my all time favorite color combo must be black, white and red. I gravitate to that a lot. And today's card proves that it works so well...at least I think so.


I dyed my white/silver edge metallic ribbon with some cherry cobbler reinker. I love the result. It isn't perfect, but I kinda like a little imperfection. I think it looks rustic. Plus, nothing handmade is ever perfect.


Cardstock: Cherry Cobbler, Basic Black
Designer Series Paper: Merry Little Christmas
Ink Pads: Cherry Cobbler
Dies (using Big Shot machine): Layering Circles 
Adhesives: Snail Adhesive and Stampin' Dimensionals

Thank you so much for stopping by. I hope you found something interesting to inspire you here today.


Saturday, November 11, 2017

October 2017 Paper Pumpkin, I'm in Love

So yesterday I finally had a chance to pull out my October Paper Pumpkin kit, and I SO WISH that I had gotten more than one! This is by far the best kit I have ever received from Paper Pumpkin. In fact, over the last few months, I have really enjoyed my kits a lot more than usual. I can't wait for my November Paper Pumpkin now. It is designed to work with the one from October, so I'm super excited. It's too bad I didn't make this post before. Someone might have benefitted from it and been able to order the November kit at least. But the cutoff date was yesterday :(  However--I'm sure there will be more fabulous kits to come. So, if you order, please make sure to choose me (Michelle Scott) as your demonstrator when you order :)

Now, onto the fun--here are my pictures of the project made with my kit. I got all the supplies to make 5 of each style of these cards, plus more that I can use to make future cards! I'm really loving the stamp set in this kit. It's perfect. I'm sure I'll be using it on some holiday cards this year.


The projects were so perfectly designed that I didn't even feel the need to come up with an alternate use or design at all. I just loved what they were designed for. 


Stay tuned for more projects using the stamps in this kit and for the November Paper Pumpkin projects!

Thank you so much for stopping by. I hope you found something interesting to inspire you here today.


Saturday, October 28, 2017

Always & Forever (I'm back!)

I'm back! Lol. Wow. October has been a really busy month. We bought a new truck, and we had to fix the 4Runner (a lot). Shane got pneumonia, and I've had a cold. Anyway, I just really had no time for blogging. But, I'm here now, so let's get to it.

I was challenged by my upline to create a card using a stamp set that had never had ink to it before. I love the Always & Forever set, but I hadn't had time to really play with it yet. And, surprisingly, not many people have. I wasn't able to find a lot of inspiration out on the internet. So, I looked up a sketch from Clean and Simple Sketches and got to work.

I chose FTL sketch #37 because it had a large round element on it, which was similar to the stamp I wanted to use from my stamp set.


I stamped the large round wooden piece with a heart twice on whisper white. I water colored one of them with my aqua painters using Crumb Cake, Early Espresso, and Regal Rose (retired). I just cut it out by hand. Then on the second one I just colored the heart in and cut it out. I used a Stampin' Dimensional to pop it up on top of the other.


I used the following Stampin' Up! products available for purchase in my SU store at the link in the sidebar :) 
Cardstock: Early Espresso, Whisper White, Old Olive
Designer Series Paper: Wood Textures DSP
Ink Pads: Early Espresso, Crumb Cake, Regal Rose (retired, but you could use any dark pink)
Stamp Sets: Always & Forever
Punches: Leaf Punch
Adhesives: Snail Adhesive and Stampin' Dimensionals
Other Accessories: Stampin' Sponges for inking edges, small bit of pink patterned paper from my stash (non-Stampin' Up!)

Thank you so much for stopping by. I hope you found something interesting to inspire you here today.


Friday, September 22, 2017

Vacay!

I'm so excited. We leave for vacation in the morning. We go on a 9-day hunting/camping trip every year. We wives will be spending a lot of time in camp while the man folk are hunting critters. So I thought this would be the perfect opportunity for me to catch up on some of my Paper Pumpkin kits that I never got to do!

This is the perfect thing to bring camping. The kits come with everything I need, including ink spots, adhesive... everything. My beginner kit came with a stamp block. So I don't need to have anything else with me. And I can catch up on my 100 Days Project too!

Welp--I'm gonna go finish up some packing. But, before I go, let me remind you that early registration for Fall Stampfest closes on October 1st. Get your tickets now to save $10! Your registration fee includes 8 projects, catered lunch, door prizes, samples galore, demonstrations and a fabulous time with friends! 


Thank you so much for stopping by. I'll catch up when we come back!

Sunday, September 17, 2017

Lovely Christmas

Hey all! I'm back. Kind of. I can't even tell you how exhausting working 65 hours in one week, in the heat, is. It's been a week since I've been back on on a semi-regular schedule, and I'm still tired!

I did find some time to make a card today. It felt good. Like home :)

This card was made using one of my favorite stamp sets, Lovely as a Tree. I've actually bought a replacement set for this one already because my other was wood block, and I like cling mount better. This set will never retire. It holds a special place in the founder, Shelli Gardner's, heart, and she has stated that as long as she has any say, it will remain.


I used the following Stampin' Up! products available for purchase in my SU store at the link in the sidebar :) 
Cardstock: Berry Burst and Whisper White
Ink Pads: Memento Tuxedo Black, Berry Burst, and Tangerine Tango
Stamp Sets: Lovely as a Tree
Tools: Sponges, Big Shot and Pinewood Planks Dynamic Textured Impressions Embossing Folder
Embellishments: Sequins from Iridescent Sequin Assortment

Thank you so much for stopping by. I hope you found something interesting to inspire you here today.

Don't forget to register for Fall Stampfest! Discount for early registration (before Oct 1). Your registration fee includes 8 projects, catered lunch, door prizes, samples galore, demonstrations and a fabulous time with friends! 

Sunday, September 3, 2017

More Painted Harvest Love

So, the next few weeks are going to be crazy busy at my "regular" job (or at least, we hope they will be). This is probably the last crafty thing I will have time for for a while. 😒😔😞  I chose to use Painted Harvest again because I just love the way the layers on this two-step stamp set have so much depth. I hadn't done it in yellow & orange yet, so I wanted to try that. Love how it turned out. But, I have to confess, I am partial to the ones I did in Cherry Cobbler. No surprises there. I 😍 red.

I used the following Stampin' Up! products available for purchase in my SU store at the link in the sidebar :) 
Cardstock: Early Espresso, Crushed Curry, Whisper White
Ink Pads: Early Espresso, Crushed Curry, Tangerine Tango
Stamp Sets: Painted Harvest
Punches: Leaf Punch
Ribbon: Old Olive Mini Chevron RibbonAdhesives: Snail Adhesive and Stampin' Dimensionals
Other Accessories: Delicate White Doilies, Petal Burst Textured Impressions Embossing Folder

Thank you so much for stopping by. I hope you found something interesting to inspire you here today.


Don't forget to register for Fall Stampfest! Discount for early registration (before Oct 1). Your registration fee includes 8 projects, catered lunch, door prizes, samples galore, demonstrations and a fabulous time with friends! 


Wednesday, August 30, 2017

Carols of Christmas Swap Card

Yes, I am still doing the 100 Days Project along with my scrappy peeps at the Scrap Gals Community group on Facebook. I did end up skipping a couple of days. I've been working long hours and had a couple of family things to go to. Next week I have to work 50+ miles away, so I won't have any time to be crafty. But I'm good with that. I can catch up or just extend my project to reach 100 pieces. Go with the flow, you know?

Anyway, I got a little time to finish up some swaps I've been working on for a demonstrator group I'm in, and I'm super happy with the way they turned out. I have to say, I'm in love with that black and white flannel looking paper. I wish I could buy a whole pack of just that pattern.

I almost forgot to take a picture before I sent them off to swap. So I had to take some in my car. Lighting isn't great, but it'll do.

I used the following Stampin' Up! products available for purchase in my SU store at the link in the sidebar :) 
Cardstock: Cherry Cobbler, Old Olive, Whisper White, Crumb Cake 
Designer Series Paper: Merry Little Christmas 
Ink Pads: Basic Black Archival Ink, Real Red, Old Olive
Stamps: Carols of Christmas
Dies: Stitched Shapes Framelits Dies, 
Punches: Holly Berry Builder PunchRibbon and Trim: Burlap Ribbon
Adhesives: Tear & Tape, Stampin' Dimensionals, Snail Adhesive and a glue gun
Other Accessories: Delicate White Doilies, Crushed Curry Stampin' Write marker

Thank you so much for stopping by. I hope you found something interesting to inspire you here today.


Don't forget to register for Fall Stampfest! Discount for early registration (before Oct 1). Your registration fee includes 8 projects, catered lunch, door prizes, samples galore, demonstrations and a fabulous time with friends! 


Wednesday, August 23, 2017

Colorful Seasons Snowflake Love!

Day 22. So ummm.......believe it or not, I wasn't going to get this stamp set. Yep. I didn't think it was for me. Then I started seeing all of the examples online. Still resisting. But, the more time you spend on Pinterest, the harder it is to resist. And eventually I had to cave and buy it. And I'm here to tell you, I'm so glad I did! This set is awesome. Seriously. It covers every season and I can't think of an occasion you wouldn't be able to use it for.  

I decided to try a new technique today. I've done this heat embossing resist technique you see here numerous times (The white snowflakes are heat embossed before inking the cardstock. The embossing makes them resist the ink and stay white). But I wanted to try sponging the background in an ombre effect. Oh yeah. This could be addictive. I just stamped and embossed the white snowflakes using Versamark ink and clear embossing powder. Then I used the stamping sponges (I cut them into 4 pieces so I can use them with different colors.) to rub the colors on one at a time to put the color down light to dark. Then, stamp the colored snowflakes on top. Easy peasy. 


Isn't that gorgeous?! I used the same three ink pads to stamp my sentiment as with an ombre effect as well. Just start by inking with the lightest color, then ink only part of the stamp in the next darker color, and finally ink an even smaller portion in the darkest color. I just learned that one at a stamping get-together a couple of weeks ago. You can do that with markers too. But it's nice if you don't have to buy more products than is actually needed to achieve the affect. Don't you agree?


I used the following Stampin' Up! products available for purchase in my SU store at the link in the sidebar :) 
Cardstock: Whisper White
Stamps: Colorful Seasons
Ink Pads: Pool Party, Bermuda Bay, Dapper Denim and Versamark
Ribbon and Trim: 3/8" Metallic Edge Ribbon in Silver
Embellishments: Glitter Enamel Dots and Rhinestone Basic Jewels
Other: Snail Adhesive, Stampin' Dimensionals, Heat Tool

Thank you so much for stopping by! I hope you found something interesting to inspire you here today.


Don't forget to register for Fall Stampfest! Discount for early registration (before Oct 1)


Tuesday, August 22, 2017

Winter Theme Gift Box

I have been loving the Colorful Season stamp set for all of it's autumn splendor possibilities. Because fall is my favorite season. But, last night I decided to explore it's winter potential. And boy did I! This box came together surprisingly quick using the Simply Scored Scoring Tool and a tutorial I found on SplitcoastStampers.com.


I used the following Stampin' Up! products available for purchase in my SU store at the link in the sidebar :) 
Cardstock: Dapper Denim, Whisper White, and Bermuda Bay
Stamps: Colorful Seasons
Ink Pads: Pool Party, Bermuda Bay, Dapper Denim and Whisper White
Ribbon and Trim: Shimmer Ribbon in Pool Party
Embellishments: Rhinestone Basic Jewels
Other: Snail Adhesive, Stampin' Dimensionals

Thank you so much for stopping by! I hope you found something interesting to inspire you here today.


Don't forget to register for Fall Stampfest! Discount for early registration (before Oct 1)


Monday, August 21, 2017

Baby Wipes Are Now My Favorite Tool!

Isn't this just gorgeous? Not to toot my own horn, but....toot! Ha ha.


So, yesterday I tried a technique that has been around forever. But it was my first try with it. Can I just say that I adore this baby wipes technique? This is so simple but has such an amazing, impactful affect on your cards!

I found a few tutorials for this on YouTube. Basically, all you do is take a baby wipe and fold it in half twice. I personally like a nice, substantial wipe. So I use Huggies. But it probably doesn't really matter. You'll want to put it on a paper plate or something to protect your work surface. Then, put drops of color from your Stampin' Up! reinker bottles onto the baby wipe. I actually didn't drop them on, I put the nozzle on the baby wipe and made a good size little spot of each one in several different places on the wipe. You can use as many or as few colors as you like. I used five colors on this one (they are noted in the below product listing).

Here is a picture of what my little homemade ink pad looked like:


Then, just take your stamp and pounce it on the inked up baby wipe. You'll want to make sure you are pouncing it in as close to the same spot on the wipe as possible each time because if you don't, you'll make your colors mix too much and it will start to get muddy. 

Next, just stamp it on your paper and then ink it up again for the next image. Easy peasy! I didn't need to clean my stamp in between each image because most of the ink did transfer to my cardstock the first time. But you might want to test yours to make sure. 

I used the following Stampin' Up! products available for purchase in my SU store at the link in the sidebar :) 
Cardstock: Berry Burst, Crushed Curry, and Whisper White
Stamps: Colorful Seasons
Ink Pads: Early Espresso
Ink Refills: Berry Burst, Pumpkin Pie, Crushed Curry, Pear Pizzazz, and Old Olive
Ribbon and Trim: Crinkled Seam Binding Ribbon in Berry Burst
Embellishments: Gold Sequins from Metallic Assortment
Other: Snail Adhesive, Tombo Mono Liquid Glue Adhesive

Thank you so much for stopping by! I hope you found something interesting to inspire you here today.


Don't forget to register for Fall Stampfest! Discount for early registration (before Oct 1)


Sunday, August 20, 2017

On a Box Kick

Day 19 of my personal progress on the Scrap Gals 100 Days Project. I had so much fun making the last box that I decided to try another. I also used the flower from the Painted Harvest stamp set to make a wreath! I got the idea from another demonstrator on Instagram (Kristin Hayes), who got it from My Ink Pad to Yours. I love the Stampin' Up! demonstrator community! Everyone is always so willing to share their ideas.
This is the box without the tag. I really like that black and white designer series paper. So versatile! Not just for Christmas. And how about that crochet trim? This picture really doesn't do it justice. I love it!

I used the following Stampin' Up! products available for purchase on September 1st in my SU store at the link in the sidebar :) 
Cardstock: Real Red, Old Olive
Designer Series Paper: Merry Little Christmas Designer Series Paper
Ink Pads: Old Olive and Real Red
Stamps: Painted Harvest
Dies: Layering Circles Framelits Dies
Punches: 2" Circle Punch, Scalloped Tag Topper Punch
Ribbon and Trim: Black Vintage Crochet Trim
Other: Snail Adhesive

Thank you so much for stopping by. I hope you found something interesting to inspire you here today.


Don't forget to register for Fall Stampfest! Discount for early registration (before Oct 1)